MacBook Pro Video Editing Setup: Specs, Software & Workflow Guide
You bought the MacBook Pro. The chip is fast on paper. Yet the timeline stutters during multi-cam playback, the beach ball spins when you scrub through a graded clip, and a 20-minute export takes long enough to make coffee, eat lunch, and start questioning your purchase. If this describes your week, the problem is almost never that the machine isn't powerful enough. The problem is that macbook pro video editing performance is a function of four interacting variables — and most buying guides only discuss the first one.
The four levers that actually decide whether your machine flies or crawls are: unified memory size, memory bandwidth, GPU core count, and storage throughput. The chip name on the lid (M3, M3 Pro, M3 Max) is a summary of those variables, not a substitute for understanding them. A 16GB M3 Pro can choke on a multi-cam timeline that a 36GB M3 Pro handles without effort, even though the chip generation is identical.
Unified memory size is the headline variable most editors get wrong. Apple Silicon's unified memory architecture pools RAM between CPU, GPU, and Neural Engine. That sharing is efficient, but it also means a 4K timeline with effects competes with macOS, your browser, and any background app for the same memory pool. Apple (apple.com/macbook-pro/specs) configures base chips down to 8GB, which is structurally insufficient for current 4K editing the moment you open a second app.
Memory bandwidth scales sharply across the chip tiers. Base M-series chips offer roughly 100 GB/s; Pro variants roughly double that; Max chips push past 400 GB/s. For scrubbing a single 4K H.264 stream, base bandwidth is fine. For three or four 4K streams stacked on a multi-cam clip, bandwidth becomes the wall you hit before CPU or GPU saturation.
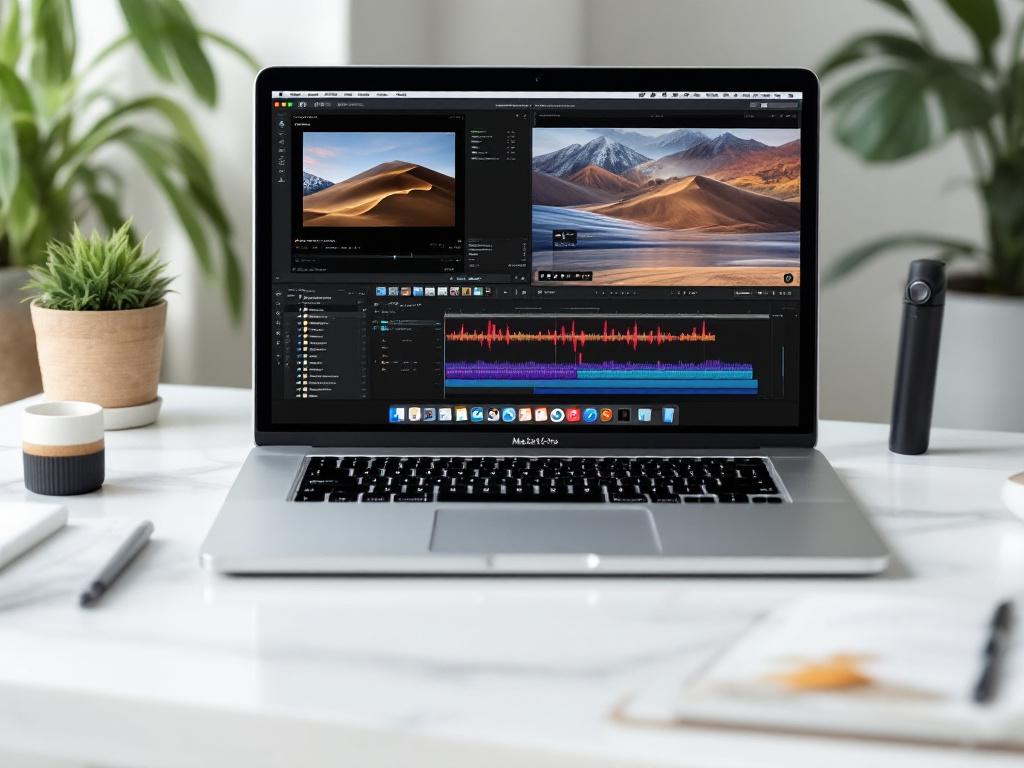
GPU core count decides how color grading and effects feel. Base M3 ships with a 10-core GPU; M3 Pro lands in the 14–18 core range; M3 Max stretches to 30–40 cores. For Final Cut Pro, which leans heavily on the Apple Media Engine and Neural Engine, GPU cores matter less. For DaVinci Resolve, which is GPU-driven, doubling GPU cores roughly doubles how many color nodes you can stack before playback breaks.
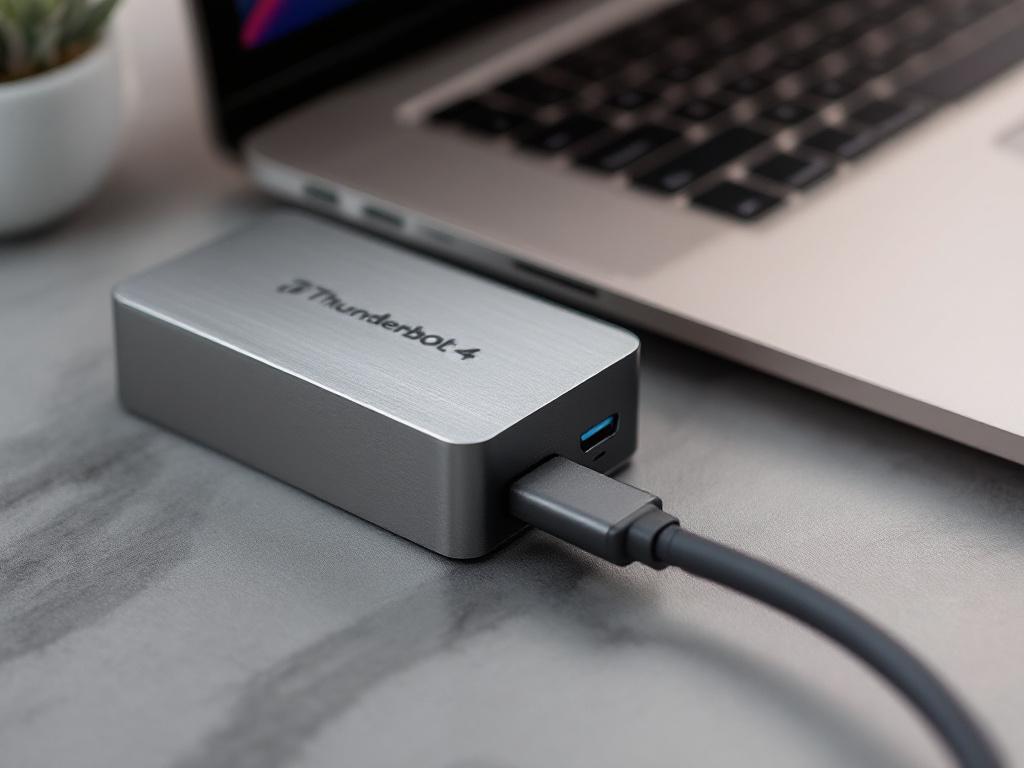
Storage throughput is the lever editors forget exists. Internal SSDs on MacBook Pro are fast, but they fill quickly with 4K media, and external storage becomes the editing surface for any real project. Thunderbolt 4 theoretical bandwidth tops out at 40 Gbps, which translates to roughly 2,800–3,000 MB/s of practical sustained throughput on quality NVMe enclosures. USB-C alternatives sit far below that ceiling.
What follows walks through the specs that matter for your footage, the software that's actually optimized for Apple Silicon, the workflow adjustments that recover performance on machines you already own, and the storage architecture that scales beyond a single project.
Table of Contents
- Chip and RAM Configurations Matched to Editing Workloads
- Video Editing Software for MacBook Pro Compared
- Proxy Workflows and Real-Time Playback
- External Storage Architecture for MacBook Pro Editing
- Color Grading, Effects, and Realistic Export Expectations
- MacBook Pro Video Editing Setup Checklist
Chip and RAM Configurations Matched to Editing Workloads
The right configuration is the one matched to the heaviest footage you'll regularly edit, not to an abstract "good / better / best" tier. Read the table below as a workload-to-spec map. The "minimum viable" column is the configuration that allows real-time playback for that workload without proxies on most projects. The "comfortable" column is the configuration that handles that workload plus growth (more streams, more effects, longer timelines) without forcing workflow compromises. Buying below the minimum viable spec for your workload means designing your workflow around the machine's limitations from day one.
| Workload | Minimum Viable | Comfortable | Notes |
|---|---|---|---|
| 1080p single-stream | M2 / M3 base, 16GB | M3 Pro, 18GB | Base chips handle without proxies |
| 4K single-stream (H.264/HEVC) | M3 Pro, 18GB | M3 Pro, 36GB | Proxies advised on base chips |
| 4K ProRes editing | M3 Pro, 18GB | M3 Max, 36GB+ | CPU/storage-heavy, not GPU-heavy |
| Multi-cam 4K (3+ angles) | M3 Max, 36GB | M3 Max, 48GB+ | Bandwidth is the limiter |
| Heavy color grading (Resolve) | M3 Max, 36GB | M3 Max, 64GB+ | GPU cores drive node performance |
| 8K editing | M3 Max, 48GB | M3 Max, 64–128GB | Proxy workflow effectively required |
The 8GB base configuration that Apple still sells deserves a direct warning: it is not viable for current 4K editing work, regardless of chip generation. macOS plus a single editing app plus a browser tab or two consumes 6–8GB before you've opened a project. Memory pressure pushes the system to swap to SSD, which is fast on Apple Silicon but still vastly slower than RAM. The result is a stuttering experience that no chip upgrade fixes because the bottleneck is memory, not compute.
The second hard rule: RAM cannot be upgraded after purchase on Apple Silicon. It's part of the system-on-chip package. Whatever you order is the ceiling for the life of the machine. The practical implication is to buy one tier above your current minimum. If you edit 1080p today and might move to 4K in 18 months, 18GB instead of 16GB is cheap insurance. If you edit 4K and might add multi-cam, 36GB instead of 18GB pays for itself the first time you cut three angles together.
GPU cores warrant separate attention if Resolve is your editor of choice. Each Resolve color node is a GPU operation; complex grades with multiple secondaries, qualifiers, and noise reduction compound quickly. A 10-core base GPU handles a few nodes per clip before forcing render cache; 30–40 cores on M3 Max handles substantially more node depth before caching becomes mandatory.
Storage on the order form is the third trade-off. A 512GB internal SSD holds roughly 2 hours of 4K ProRes 422 HQ footage, or 6–10 hours of 4K H.264. Once you account for macOS, apps, and free space buffer (Apple recommends keeping at least 10–20% free), 512GB fills inside the first real project. 1TB is the practical floor for editing locally; 2TB is the comfortable choice if budget permits.
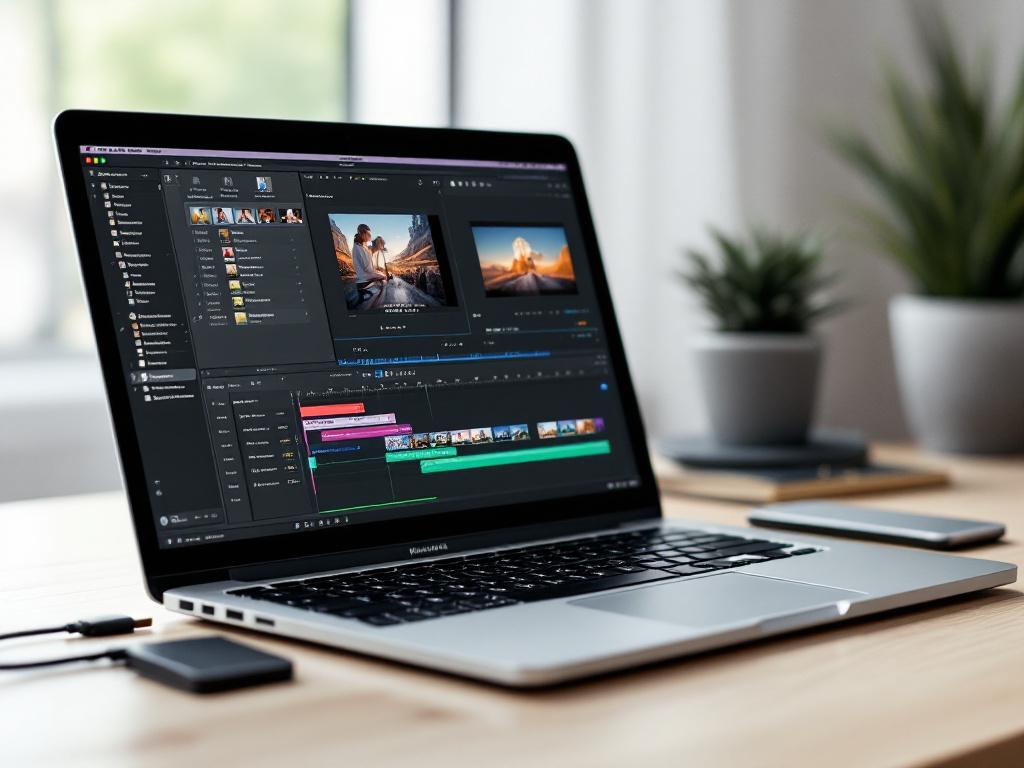
Video Editing Software for MacBook Pro Compared
Three editors dominate macOS video work, and the choice locks you into a broader ecosystem. Final Cut Pro is Apple-native, one-time purchase at $299.99, and reaches deepest into Apple Silicon's hardware acceleration. Adobe Premiere Pro is subscription-based at roughly $22.99/month, runs cross-platform with Windows teams, and integrates tightly with After Effects, Photoshop, and the rest of Creative Cloud. DaVinci Resolve offers a genuinely production-capable free tier plus a $295 one-time Studio upgrade, with color grading that remains the industry reference. The selection drives related decisions: motion graphics (Apple Motion versus After Effects versus Fusion), encoding tools (Compressor versus Media Encoder), and project file portability if you ever hand off to another editor.
| Feature | Final Cut Pro | Premiere Pro | DaVinci Resolve |
|---|---|---|---|
| Pricing | One-time $299.99 | ~$22.99/month | Free / Studio $295 |
| Apple Silicon native | Yes | Yes (since 2022) | Yes |
| Free trial | 90 days | 7 days | Free tier permanent |
| Timeline model | Magnetic | Track-based | Track-based |
| Color tools | Wheels + curves | Lumetri | Industry standard |
| Motion graphics | Motion ($49.99) | After Effects (sub) | Fusion (integrated) |
| Cross-platform | macOS only | macOS + Windows | macOS + Windows + Linux |
| ProRes export | Hardware-accelerated | Yes | Studio for some flavors |
Final Cut Pro fits editors who want the tightest Apple Silicon integration, prefer paying once, and work solo or on Mac-only teams. The magnetic timeline is faster for short-form work — social cuts, YouTube edits, anything where you're sliding clips around constantly — but it confuses editors arriving from Premiere or Avid. The 90-day trial is long enough to finish an actual project and decide honestly. Hardware-accelerated ProRes export via the Apple Media Engine is the fastest path to deliverable files on macOS.
Premiere Pro fits editors who collaborate with Windows-based teams, already live in Adobe Creative Cloud, or take client work where Premiere project files are the expected deliverable. The subscription is the long-term math problem: at $22.99/month, you pass the Final Cut Pro one-time cost in roughly 13 months, and you keep paying after that. The trade-off is cross-platform parity and the After Effects pipeline, which has no real Mac equivalent for compositing-heavy work.
DaVinci Resolve fits editors who put color grading first, want a zero-cost entry, or need one application that combines edit, color, Fusion compositing, and Fairlight audio post. The free tier handles 4K editing, most color tools, and standard delivery codecs. Studio unlocks noise reduction, HDR grading, additional codec support, and the neural-engine-accelerated tools that matter for high-end finishing. After Effects on Apple Silicon runs native since 2022, so the Rosetta 2 translation penalty that older guides still warn about no longer applies to current versions — verify the specific release in Adobe's release notes if you're working from older documentation.
For quick clip-level work outside your main editor — extracting a 30-second section to send a client, cropping audio for a voiceover, converting a deliverable to a different format — opening a full project is overhead you don't need. Browser-based tools handle these tasks in seconds. You can trim clips in your browser without opening a project or isolate or trim an audio track without uploading files anywhere; processing runs locally via WebAssembly.
Proxy Workflows and Real-Time Playback
A proxy is a lower-resolution stand-in file — typically ProRes Proxy or quarter-resolution H.264 — that your editor uses for timeline playback while the original media stays untouched on disk. On export, the application relinks to the originals and renders at full quality. Proxies decouple timeline performance from final output quality. Even on M3 Max, a heavily-effected 4K timeline can stutter; proxies let the machine play back smoothly regardless of source complexity. The setup cost is generation time and disk space. The payoff is hours of recovered editing time on any project longer than a few minutes of finished output.
Step 1: Audit your timeline performance baseline. Open Activity Monitor in a second window and play a representative section of your timeline. Watch CPU and memory pressure during scrubbing. If CPU sits above 80% sustained, or memory pressure turns yellow or red, proxies will help. If playback is already smooth, skip proxies — generating them costs time and disk space you don't need to spend.
Step 2: Choose your proxy format. ProRes Proxy is the macOS standard because the Apple Media Engine decodes it with hardware acceleration. Quarter-resolution H.264 produces smaller files but uses slightly more CPU during playback. For most MacBook Pro workflows, ProRes Proxy is the right answer — the larger file size is offset by smoother playback and faster scrubbing.
Step 3: Generate proxies in your editor. In Final Cut Pro, select your clips, then File → Transcode Media → check "Create proxy media." In Premiere Pro, right-click in the Project panel, choose Proxy → Create Proxies, and pick a preset. In DaVinci Resolve, right-click a clip and choose Generate Optimized Media (Resolve's proxy equivalent). Each application can batch the operation across an entire bin while you work on something else.

Step 4: Switch the viewer to proxy playback. Each editor has a toggle. Final Cut Pro: View menu → Media Representation → Proxy Preferred. Premiere: the Toggle Proxies button in the Program Monitor (you may need to add it to the button bar). Resolve: Playback menu → Use Optimized Media if Available. After flipping the toggle, scrub the timeline again and confirm it now plays without dropping frames.
Step 5: Store proxies on fast external storage. A long project can generate hundreds of gigabytes of proxy media. Direct that to a Thunderbolt 4 external SSD rather than your internal drive. The internal SSD should stay under 80% capacity for macOS to perform well; dumping proxies there fills it fast and degrades overall system responsiveness, not just editing performance.
Step 6: Confirm export uses original media. Before kicking off a final render, double-check that the editor is rendering from originals, not proxies. Each application has a setting (Final Cut Pro: Media Representation back to Optimized/Original; Premiere: Toggle Proxies off; Resolve: Use Optimized Media unchecked at delivery). Misconfiguration produces a final file at proxy resolution, which is a several-hour mistake on a long export.
Proxy setup for a typical project takes 30–90 minutes depending on footage volume, mostly unattended while transcoding runs in the background. For short-form content under five minutes of finished output, proxies may not be worth the overhead on M3 Pro or M3 Max — test playback with originals first. For long-form work, multi-cam edits, or any project where you'll scrub the timeline thousands of times, proxies are not optional.
A codec decision upstream of proxies matters even more for some workflows. If you can shoot natively in ProRes 422, or transcode source footage to ProRes 422 before editing, the Apple Media Engine decodes it with hardware acceleration that often eliminates the need for proxies on M3 Pro and above. The trade-off is file size: ProRes 422 runs roughly 5–10× larger than equivalent H.264. For a half-hour 4K shoot, that's the difference between 30GB and 200GB of source media. Pick the trade-off that fits your storage budget, not the one your camera defaults to.
External Storage Architecture for MacBook Pro Editing
Internal SSD alone does not scale for editing work past the first or second project. A 512GB MacBook Pro internal drive holds roughly 2 hours of 4K ProRes 422 HQ footage, or 6–10 hours of 4K H.264. Add macOS at around 20GB, your editing apps, browser caches, system caches, and the free space buffer macOS needs to perform well, and the practical capacity for media drops considerably. Apple advises keeping the boot drive at no more than 80% capacity for sustained system performance. For an editor finishing one project while ingesting the next, the math doesn't work without external storage as the primary editing surface.
Thunderbolt 4 is the standard that makes external storage practical for editing. The specification provides up to 40 Gbps of theoretical bandwidth, with practical sustained throughput on quality NVMe enclosures landing in the 2,800–3,000 MB/s range. That's fast enough to edit multi-stream 4K directly from external storage on Apple Silicon without performance penalty compared to internal SSD. USB-C without Thunderbolt is a different conversation: USB 3.2 Gen 2x2 tops out around 1,000 MB/s on paper and considerably less in sustained real-world transfers, and older USB-C standards land lower still. The difference matters for multi-cam work, where bandwidth gets divided across simultaneous streams.
The practical implication: a Thunderbolt 4 enclosure with a quality NVMe inside performs nearly identically to internal SSD for editing purposes. A USB-C SATA SSD, even one labeled "external NVMe," does not — SATA's protocol caps throughput at around 550 MB/s regardless of the drive inside. Read the spec sheet on any drive you're considering, not the marketing copy on the box.
On Apple Silicon, the editing bottleneck is rarely the CPU. It is almost always storage speed or RAM saturation. Solve storage first.
A three-tier storage model handles ongoing editing work without forcing constant file shuffling. The boot drive (internal SSD) stays clean: macOS, applications, OS-level caches, and nothing else. The active project drive (Thunderbolt 4 external SSD) holds the current project's media, proxies, and render cache — this is where editing actually happens. The archive drive (large HDD or NAS) holds completed projects, raw camera dumps, and long-term storage; it's slow but cheap, and you never edit directly from it. Moving from a single-drive setup to this three-tier model is the single biggest performance and workflow change most editors can make without buying a new computer.
RAID configurations deserve a brief mention. RAID 0 stripes data across two drives and roughly doubles throughput, but it also doubles failure risk — if either drive fails, you lose everything on the array. RAID 1 mirrors data for redundancy but costs you half your capacity. For most solo editors, a single high-quality Thunderbolt SSD paired with a disciplined backup routine is simpler, cheaper, and safer than running RAID. Backup discipline matters more than RAID redundancy, because RAID protects against drive failure but not against accidental deletion, project corruption, or theft.
Scratch disk and cache placement is the configuration step most editors skip. Every editor has settings for where it writes render previews, waveform caches, optimized media, and project autosaves. By default, many of these point at the boot drive. Change them to point at your active project drive instead. In Final Cut Pro, the library file (.fcpbundle) stores media inside itself by default; configure the library properties to use external media storage and set the location to your project drive (File → Library Properties → Modify Settings → choose External). In Premiere, set Scratch Disks per project (File → Project Settings → Scratch Disks). In Resolve, the Project Settings → Master Settings panel controls cache file location.
Doing this once per project prevents the boot drive from quietly filling with multi-gigabyte cache files you forget exist. It also keeps your editor's database and project files performing well, because they're not competing with system processes for the same storage I/O.
Color Grading, Effects, and Realistic Export Expectations
Final export is the most resource-intensive task in editing. Even on M3 Max, a 4K project loaded with effects exports considerably slower than real-time playback. Setting accurate expectations up front prevents the "is my Mac broken?" panic that hits at minute 40 of a render you assumed would take 15. The variables that drive render time are predictable, and once you understand them, you can plan exports around your schedule instead of staring at a progress bar.
- Color grading scales with GPU cores, not CPU. DaVinci Resolve's node-based grading is GPU-accelerated end to end. On a base M3 with a 10-core GPU, simple primary grades on 4K footage play in real time; stack secondaries, qualifiers, noise reduction, and OFX plugins and the timeline starts requiring render cache to maintain playback. M3 Max with 30–40 GPU cores handles substantially deeper node trees before forcing cache. Final Cut Pro's color tools lean less on raw GPU and more on the Apple Media Engine and Neural Engine, which is why FCP often feels faster than Resolve on identical hardware for moderate color work — different architectures, different bottlenecks.
- Effects rendering compounds with each layer. Every added effect — blur, warp, stabilization, third-party plugin — multiplies per-frame render time. A timeline with two effects per clip can take 3–5× longer to export than the same timeline with no effects. Before committing to an overnight render of a 30-minute project, test-render a representative 30-second segment first. If that segment takes four minutes, your full project is on a roughly two-hour trajectory. Better to know that before you start.
- Hardware-accelerated encode matters more than chip generation. The Apple Media Engine accelerates ProRes, H.264, and HEVC encoding directly on the chip. Final Cut Pro uses this aggressively for export. Premiere uses it for H.264 and HEVC. DaVinci Resolve Studio uses it for ProRes and H.265. Export codecs that hit hardware acceleration render dramatically faster than codecs that fall back to software encode. If you're delivering H.264 or HEVC, you're on the fast path. Niche or older codecs may not hit acceleration, in which case expect roughly 2–3× longer renders regardless of which chip you're on.
- Third-party plugins remain the wildcard. Some older plugins — certain Boris FX tools, legacy Red Giant components, older AE plugins called through Motion — were slow to gain native Apple Silicon support. A single non-native plugin can drag an entire timeline back to Rosetta 2 translation speeds, which negates much of the chip's performance advantage. Check each plugin vendor's release notes for "native Apple Silicon support" before assuming current performance. If you've inherited a project from another editor, audit the effects panel before estimating render time.
- Segment long exports to reduce crash risk. A 60-minute final render that fails at minute 55 wastes most of an afternoon. For long-form projects, export in 10–15 minute segments and stitch the segments in a final concatenation pass, or use compound clips and nested sequences to chunk the timeline so each chunk can render independently. Background app activity, sleep settings, and power adapter status all influence whether a long export completes successfully — exports should run on AC power with sleep disabled and resource-heavy background apps closed.
A 30-minute 4K project with moderate effects can take several hours to export, even on M3 Max. Plan exports around your sleep schedule, not your deadline.
The pattern across all five points is the same: render time is predictable if you understand which variables apply to your specific project. The chip is one input. Codec, effect density, plugin compatibility, and segmentation strategy together account for the rest. Editors who blame the machine when exports run long are usually editors who haven't audited the other four.
MacBook Pro Video Editing Setup Checklist
Two checklists below. The first is for readers about to buy a MacBook Pro and configure it. The second is for readers optimizing a machine they already own. Each item is a decision or a concrete action — work through them in order rather than cherry-picking.
Pre-Purchase Decisions
- Define your highest-resolution footage. 1080p, 4K, multi-cam 4K, or 8K. This single answer determines your chip tier. Don't configure for the project you're working on this week; configure for the heaviest footage you'll regularly handle in the next two to three years.
- Estimate your peak project complexity. Single-stream cuts demand far less than multi-cam edits or color-heavy grading. Color-grading-heavy work pushes you toward M3 Max for the GPU core count, regardless of resolution.
- Size RAM one tier above your minimum. Memory is soldered and not upgradeable for the life of the machine. 16GB is the floor for any 4K work; 36GB or more for multi-cam, color grading, or any workflow with multiple apps open simultaneously.
- Choose 1TB internal SSD minimum. 512GB fills inside the first real project once you account for macOS, apps, and free space buffer. 1TB is the practical floor; 2TB makes life easier if budget permits.
- Budget for external Thunderbolt 4 storage. At least 2TB external, ideally 4TB. Treat this as part of the MacBook Pro purchase, not an optional accessory you'll get to later.
- Decide your software before purchase. Final Cut Pro is a one-time $299.99 you can plan for. Premiere is roughly $22.99/month indefinitely. Resolve Studio is a one-time $295 if you need the paid features. Factor the software cost into your total budget.
- Check display needs. 14" is portable and works fine with an external monitor at the desk. 16" gives more timeline real estate on the road. An external display connected via Thunderbolt is usually the cheaper way to gain workspace than buying the larger laptop.
- Verify return window. Apple offers 14 days. Open the box, configure the machine, and test your actual project files within that window. Don't wait three weeks to discover the configuration doesn't handle your work.
Optimization for an Existing MacBook Pro
- Open Activity Monitor and play a representative timeline. If CPU exceeds 80% sustained or memory pressure turns yellow or red, your workflow needs adjustment first — not necessarily new hardware. Diagnose before you spend.
- Set up a proxy workflow in your editor. This is the single biggest performance recovery most users can make without changing hardware. Walk through the six steps earlier in this guide and apply them to your current project.
- Move project media to a Thunderbolt 4 external SSD. Keep the internal SSD for OS, applications, and active cache only. This change alone often resolves stutter issues on machines that feel "too slow."
- Point editor scratch and cache settings at the external drive. Default settings dump cache to the boot drive in most applications. Change them per-project, not as a global default — your active project drive may change.
- Verify all plugins are Apple Silicon native. Check each plugin vendor's current release notes. Update or replace any plugin still requiring Rosetta 2 translation. One non-native plugin can hold back an otherwise fast machine.
- Clean the boot drive to under 80% capacity. About This Mac → Storage → Manage shows what's taking space. macOS performance degrades measurably when the boot drive approaches full. Archive old projects to external storage; offload Photos library if it's local.
- Establish a backup routine before the next project. Time Machine to a dedicated drive plus offsite or cloud backup for finished work. Editing drives fail eventually; the question is whether you lose a week or a year of work when one does.
When to Edit in the Browser Instead
Not every task justifies opening a full editing project. Trimming a single clip for social, cutting an interview audio file for transcription, converting a deliverable to a different format — these are minutes of work that don't warrant launching Final Cut Pro or Premiere and waiting for a project to open. Browser-based tools running locally are faster for one-off tasks. Trim video at Online Video Trimmer or isolate audio at Online Audio Cutter. Files stay on your machine — processing runs in-browser via WebAssembly, with no upload step and no server round trip. For the kind of work that interrupts your main editing flow, the right tool is the one that opens in a tab.